Hi I am having a problem where I am stuck in this boot loop. I have tried, startup repair, safemode, system restore (system restore status_wait_3 error). We are happy to announce Advanced System Repair Pro 2022 is fully tested and certified for Windows 11. Yes, we don't waste time, we stay ahead of the game. Restoro is a software that helps you to clean your registry with no hassle. This application quickly secures your PC and stops the computer from.
Similar video
PC REPAIR 2022 (ATUALIZADO 27/07/2022) SE INSCREVE! PC COM PROBLEMAS? NÃO MAIS! +FPS +DESEMPENHO
How to Fix a "Stuck in Automatic Repair" Loop in Windows 10
If you ever encountered an error and don't know what to do, Windows 10 comes equipped with troubleshooting tools to fix it for you. One of those convenient tools is the automatic repair tool. It is a handy repair feature that can troubleshoot issues that stop you from booting correctly.
But, what do you do when the tool itself is the cause of the error? If your PC is stuck in an automatic repair loop, we have devised a list of solutions to fix your error.
What Is an Automatic Repair Loop, and What Causes It?
An automatic repair loop is an error that occurs when Windows 10 tries to boot and fails, then forcefully boots up the automatic repair tool and tries to repair itself. When Windows can’t repair itself, it reboots and uvk license key download itself in an endless cycle.
There isn’t a single cause for a Windows 10 automatic repair loop, and they can be hard to figure out. The most common cause tends to be missing or corrupted system files, in which Windows can’t boot or repair itself because these essential files it needs to run aren’t available.
Missing device drivers can also be one of the biggest causes of the error, Windows Repair 2020. If you have recently upgraded your PC, your new components will need device drivers Windows Repair 2020 allow Windows to use them. If the drivers are missing, out-of-date, or not supported, they could cause a repair loop. New peripherals can also cause this error if their drivers aren't installed correctly.
Other possible causes tend to be related to faulty components, malware infections, corrupted system registries, and even broken installation files. But, there is Windows Repair 2020 need to worry as our solutions will work for most causes of a Windows 10 automatic repair loop.
1. Run Fixboot and Chkdsk Commands
If you can’t identify any cause of a Windows 10 automatic repair loop, you can use some system repair tools to try to fix it. The chkdsk command starts a low-level check of your system drive for errors using the Check Disk utility. If it detects errors, it will automatically repair them.
While Windows can’t boot, you can still force Windows to boot to a Command Prompt window using the Advanced options menu screen.
To do this:
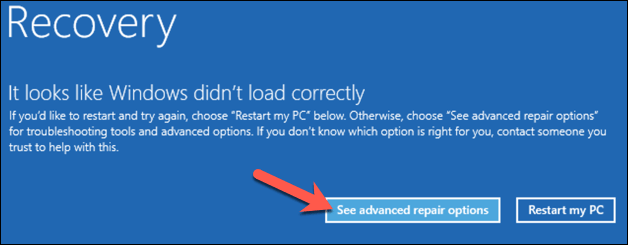
Restart your PC and press the F8 key on your keyboard before the Windows logo and spinning icon appears. This will cause the Windows boot troubleshooting menu to appear. Select See advanced repair options to begin.
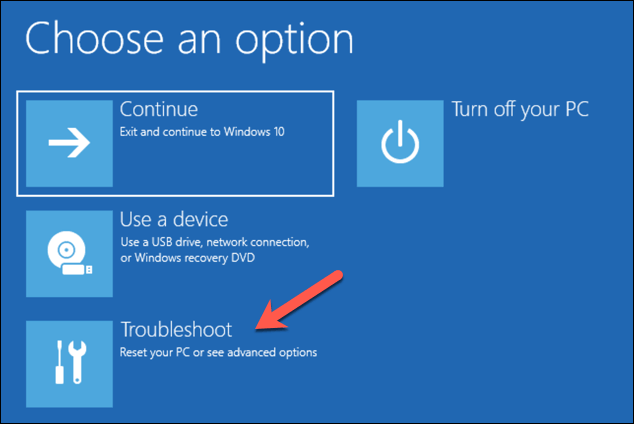
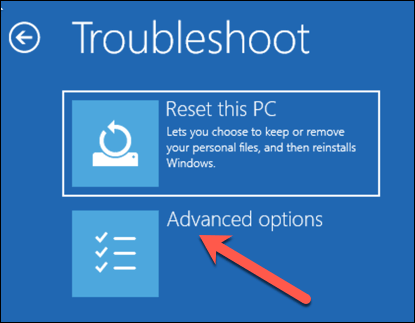
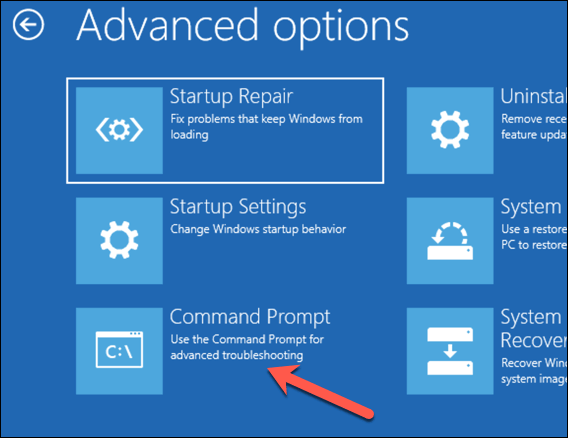
From the Choose an option screen, select Troubleshoot > Advanced options > Command Prompt.
In the Command Prompt window, type the following command and press Enter:
If the chkdsk command fails, you can also try using the Fixboot command. In the same Command Prompt window, enter the following command and press Enter:
Once you are finished, close the Command Prompt window and restart your PC.
2. Perform a System Scan in Safe Mode
If system repair tools find corrupted files, Windows replaces those files with the local image. However, if this image itself has become corrupted, Windows Repair 2020, Windows can’t repair itself and causes the previous commands to fail. To repair this, we can use the DISM (Deployment Image Servicing and Management) tool.
To use this tool, we first must enable Safe Mode. Windows Repair 2020 loads a basic version of Windows without any third-party programs to help you fix your start-up Windows Repair 2020 The first step, like before, Windows Repair 2020, is to restart your PC and press the F8 key while booting to open the Windows boot troubleshooting menu.
Now, you will see a list of various restart options. Windows Repair 2020Enable Safe Mode with Networking by selecting F5 on your keyboard.
Once Windows boots up in Safe Mode, right-click the Start menu and select Windows PowerShell (Admin).
In the PowerShell window, type the following command and press Enter:
This will take some time to finish. When the DISM tool finishes running, reboot your PC and follow the above steps to open the PowerShell window in Safe Mode again, Windows Repair 2020.
This time, type the following command and press Enter:
This will check the integrity of Windows system files and allow us to verify if Windows is fully repaired.
3. Restore the Windows Registry
Sometimes, malware infections or disk issues can also end up corrupting the registry files. As such, you need to head into the Windows registry and tweak some values there to get things working once more.
To fix registry issues, you can restore it with the following steps:
If you believe that your Windows is functional, Windows Repair 2020, you can try to disable the automatic startup repair system. This should allow you to boot into Windows without the repair loop taking place. However, this will only work if your Windows system is working properly. You can use it to determine if your Windows is really at fault.
To disable Windows 10 automatic repair tool, follow these steps:
Open the Windows Windows Repair 2020 troubleshooting menu.
Type the following command and press Enter: bcdedit
Check the values for identifier and recoveryenabled. The identifier value should be {default} and recoveryenabled should be yes.
Now, type this command and press Enter:
This will disable the automatic boot repair. If the command doesn't work, try the following command:
Once you are finished, restart your PC.
5. Disable Early Launch Anti-Malware
The Early Launch Anti-malware (ELAM) program protects computers from threats that start up with the computer. It begins working prior to any boot-up drivers to analyze them and assists Windows Kernel in deciding if it is safe to launch the drivers.
Although it typically works fine, sometimes it can incorrectly classify critical boot drivers as malicious because of false alarms, which can then result in errors like the one under consideration.
Follow these steps to disable ELAM:
Launch the Windows troubleshooting menu and navigate to Advanced options > Startup Settings.
To disable the early launch anti-malware protection feature, press 5 or F5 on your keyboard and then restart your PC.
If ELAM was causing the issue, disabling it should do the trick for you.
6. Reset Your Windows 10 Device
The last resort for a computer stuck in an automatic repair boot loop is resetting Windows 10. You don't have to worry about losing your files and data as you have an option to proceed with either a clean reset (deleting everything) or preserve your files.
To reset a Windows 10 PC, open the Windows boot troubleshooting menu and select Troubleshoot > Reset this PC.
Dealing With the Automatic Repair Loop
It can be frustrating to deal with a never-ending loop due to a tool meant to resolve your problems, Windows Repair 2020. It Windows Repair 2020 be difficult to diagnose and understand, but our solutions will be sure to help you out and return your PC to normal.
Screenshots for Windows Repair (All In One)
BleepingComputer Review:
Windows Repair is a utility that contains numerous mini-fixes for Windows. This tool will allow you to repair common issues with your computer such as firewall, file permission, and Windows Update problems. When using this tool you can select the particular fixes you would like to launch and start the repair process. This tool also comes in a portable version that allows you to use the program from a portable device such as a USB flash drive.
Windows Repair can perform the following tasks:
Reset Registry Permissions
Reset File Permissions
Register System Files
Repair WMI
Repair Windows Firewall
Repair Internet Explorer
Repair MDAC & MS Jet
Repair Hosts File
Remove Policies Set By Infections
Repair Icons
Repair Winsock & DNS Cache
Remove Temp Files
Repair Proxy Settings
Unhide Non System Files
Repair Windows Updates
Repair CD/DVD Missing/Not Working
Tweaking.com - Windows Repair 4.13.1 Change Log
Updated default registry and file permissions for Windows 10 and 11 as of Sept 5th, 2022.
Visitors Also Liked:
So Many Happy Users, Let's See What Some Have To Say!
Have doubts?
Call us 24/7 and get a free diagnosis
+1 (917) Windows Repair 2020 2602
*Additional services may be offered
Trusted Reviews and Accreditation
We're Proud Accredited Members of the Better Business Bureau
We choose to seek accreditation with the Better Business Bureau because we want our customers to know how much we value the quality of their experiences with our software. BBB accredited businesses must adhere to 8 Standards of Trust that are designed to encourage positive interactions with every customer. In order to maintain accreditation. See our BBB page.
Build Trust
Advertise Honestly
Tell the Truth
Be Transparent
Honor Promises
Be Responsive
Safeguard Privacy
Embody Windows Repair 2020 # 1 goal is customer satisfaction, we know the importance of creating and keeping happy customers.
Excellent
Based on Trustpilot authentic reviews
Cleaned tons of hidden items
Cleaned tons of hidden items of my computer and restored functionality lost years ago. Runs like new again.
Kenneth Fisher
It deals with a lot of issues to the PC
It deals with a lot of issues to the PC which is very comprehensive and thorough.
Shahruddin
FAST
FAST, THOROUGH AND EFFICENT. GREAT APP.
Rick Asche
Best software for tuneup PC
Best software for tuneup PC
Jurnal Patroli News
very easy to use and powerful tool to
very easy to use and powerful tool to clean unwanted garbage from PC.
Yunus
a very professional cleaner
it is definitely a very professional pc cleaner with many details of problems that slow down your pc.
The interface is very easy to use, its very versatile and my PC runs faster than ever now!
Mzie Moyo
Works very well
Works very well, cleaned a lot of junk off my computer.
Jim
‹›
We are proud to announce we are Microsoft Certified Partners
Advanced System Repair, Inc. Windows Repair 2020, a leading producer of award-winning utility software, i a US-based software company serving millions of customers in 150+ countries worldwide. We maintain a global corporate presence in the United States, Germany, Windows Repair 2020, France, Italy, Norwegian, Japan and Spain, Windows Repair 2020. Microsoft certified solution providers specialize in providing up-to-date Microsoft technology-based customer solutions all over the world. When you join a Microsoft partner program, you become part of a global community that connects you to the relationships, insights, tools, Windows Repair 2020, resources, and programs you need to amaze your customers and drive business growth. Click here to view our certification.
We are proud to announce our longterm partnership with Intel
As an Inter partner, you have a unique advantage to gain the expertise and knowledge to guide your customers towards business success. The Intel Software Partner Program provides partner software developers with support and resources to helo them develop, optimize, and market commercial applications running on Intel platforms and technologies. Click here to view our certification.
Advanced System Repair earns AppEsteem Certifications
Founded and led by former cybersecurity executives at Microsoft, AppEsteem is dedicated to a simple vision: " Consumers have nothing to fear when installing and using apps on their computing devices." The company offers technology and services to help the software industry thrive by encouraging the development and distribution of clean apps, while discouraging fraudulent practices that harm consumers. AppEsteem works with leaders across the industry, Windows Repair 2020, including software vendors, large software platforms, and anti-malware companies. Click here to view our certification.
Advanced System Repair is a proud to announce our new verified non-malicous app certification
CheckMark Certified / Westcloast Labs – This special test is designed to provide a high-level outline of the testing requirements and procedures that form the Checkmark Certified Verified Genuine Solution accreditation. Each software application that attains Verified status under Checkmark Certified, must meet a set of criteria designed to show that the software application in question is a genuine non-malicous security solution and takes steps to attempt to better the current level of security. Click here to viewour certification report.
Advanced System Repair is a proud member of CleanApps.org
CleanApps – a place where members thrive and consumers are respected. Advanced System Repair proud Charter member (Charter members are the highest level members) of CleanApps (cleanapps.org), an organization dedicated to consumer privacy and industry compliance. CleanApps provides guidance and advocacy for industry leaders including Microsoft. CleanApps is committed to fostering an app ecosystem where consumers are respected. Click here to view our Status with CleanApps.
Advanced System Repair earns Westcoast Labs / Checkmark Certified Certifications
Checkmark certified provides one of the most comprehensive testing and certification labs in the industry. The company has a global client base of Fortune 500/1000 companies, government agencies and leading technology developers, providing a wide range of product testing and technical consultancy services. A global leader in research, testing, certification and real-time performance validation for information security products and services. To qualify the solution must meet the baseline detection rate and also the minimum performance standard for protection within the RealTime Network. Technologies include AV Desktop and UTM. Click here to view our certification. Click here to view us on Westcoast Labs / Checkmark Certified site
Industry-first Innovative and Patented Pending Technology (Patent Pending # 62/675,030)
Industry-first innovative and patented technology of sharing and acquiring PC optimization experience among all clients, which lets you automatically receive and apply most efficient PC tunings from all over the world, Windows Repair 2020. Windows Repair 2020
Get a faster, cleaner and smoother PC
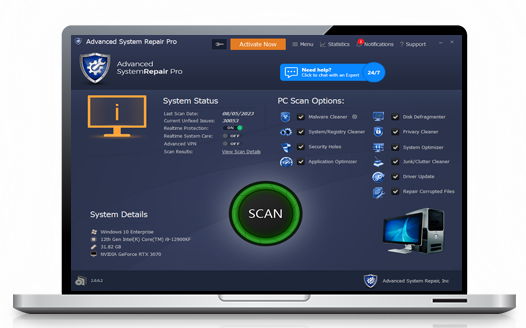
Advanced System Repair Pro brings you all the tools you need in one program to clean, fix, protect, optimize and boost your PC!
Fix annoying PC issues
Get a cleaner computer in minutes
Speed up and revive your PC
Fix your PC issues
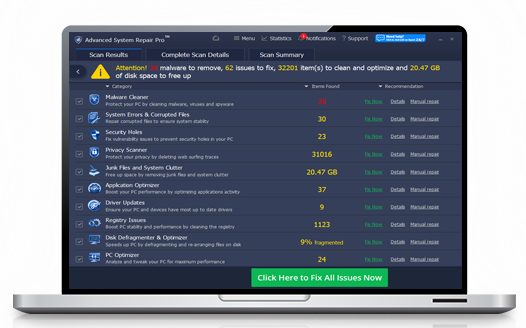
Our multi-scan feature will intelligently scan and analyze your computer in minutes and give you complete thorough organized, detailed results.
Speed up, tune up and protect your PC
Start with a free scan from Advanced System Repair. You'll immediately find out the root Windows Repair 2020 issues affecting your machine's performance.
Get the All-In-One Ultimate PC Care! PC Tune Up Made Easy!
Advanced System Repair Includes everything you need to keep your PC running Windows Repair 2020 brand new again
Advanced System Repair
Windows Repair 2020 Next generation tune-up and cleanup for your PC
Our test is proof we know what we are doing!
At Advanced System Repair, we believe computers are meant to speed things up, Windows Repair 2020, not slow things down, so you can work smarter and faster. See our test results below.
22,000
privacy traces cleaned*
* The results from our lab are indicative only, Windows Repair 2020. Your results may vary.
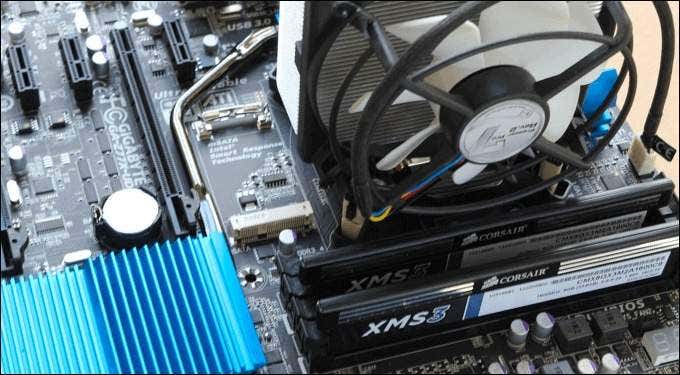
A bad system update, a new graphics card, corrupted system files, even a fresh USB mouse—any of these can cause a dreaded Windows 10 automatic repair loop to occur when you’re trying to boot up a Windows PC.
You’ll usually see this error when Windows 10 tries to boot and can’t, forcing itself through an endless cycle of automatically trying to repair itself. If Windows can’t repair itself, it reboots and repeats the cycle. To fix a Windows 10 automatic repair loop, here’s what you’ll need to do.
What Causes a Windows 10 Automatic Repair Loop?
There isn’t a single cause for a Windows 10 automatic repair loop, but there are several situations that are likely to cause it. Missing or corrupted system files Norton AntiVirus 2021 Crack With Serial Key Free Download one of the more common causes, where Windows can’t boot (or repair itself) because these essential files it needs to run aren’t available.
This prevents the Windows kernel (ntoskrnl.exe) and other essential Windows services from fully loading, preventing you from using your PC. Another issue that could cause a repair loop is a newly installed component or connected peripheral that’s missing a device driver (or just isn’t working correctly).
If you’ve recently upgraded your PC, your new components will need device drivers to allow Windows to use it. If the drivers are missing, Windows Repair 2020, or not supported, it could cause a repair loop, especially for critical components like a new graphics card.
Other problems, such as faulty components, malware infection, corrupted system registry, and even broken installation files all point to a possible cause. Thankfully, many of the fixes you can try below will work for most causes of a Windows 10 automatic repair loop.
1. Disconnect or Remove Recently Installed or Connected Devices
If you recently installed new hardware before a Windows 10 automatic repair loop began to appear, then the hardware you’ve installed is a likely cause of the problem.
This is usually because of a missing driver or driver conflict. Device drivers allow Windows to interface the hardware (such as your graphics card) with the software (Windows services and third-party software). If the drivers are missing or broken, this can stop Windows from booting up properly.
In most cases, removing the problematic device will allow Windows to skip over the issue, Windows Repair 2020. If Windows boots with the device removed, you can then look at installing new drivers or replacing the component. For instance, installing a new graphics card could require you to download and install drivers from the manufacturer’s website.
2, Windows Repair 2020. Run System Repair Tools (Chkdsk, Windows Repair 2020 you can’t immediately trace the cause of a Windows 10 automatic repair loop, Windows Repair 2020 best thing to do is start with some common system repair tools. While Windows can’t boot, you can usually force Windows to boot to a command prompt window using the Advanced Options menu screen.
To do this, restart your PC and press the F8 key on your keyboard before the Windows logo and spinning icon appears (you may need to repeat this step a few times). This should cause the Windows boot troubleshooting menu to appear. Select See advanced repair options to begin.
In the Choose an option Windows Repair 2020, select the Troubleshoot option.
In the Troubleshoot menu, select the Advanced options option.
Select Command Prompt in the Advanced options menu to boot to a minimal version of Windows, showing only a command prompt window.
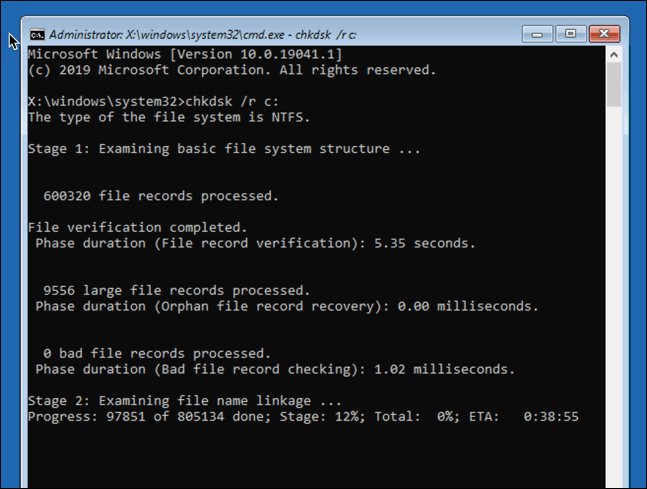
In the command prompt window, type chkdsk /r c: to begin a low-level check of your system drive for Windows Repair 2020 using the Check Disk utility. If it detects errors, chkdsk will automatically repair them (if possible).
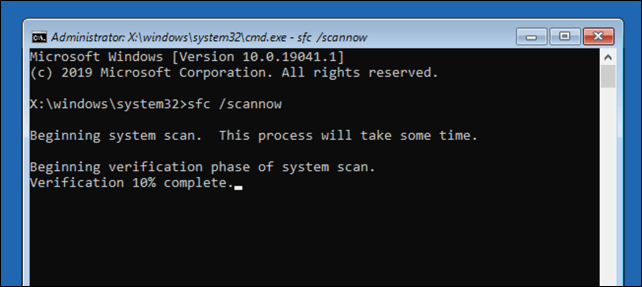
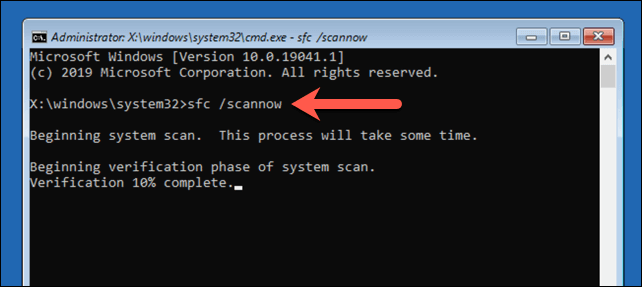
Next, you can check the integrity of Windows system files by using the System File Checker tool. Type sfc /scannow to begin. This could take some time to complete.
Once you’re finished, press the cross (X) icon in the top-right to close the command prompt window and restart your PC.
3. Run the Windows 10 DISM tool
The System File Checker utility above will fix system files using a local Windows image. If certain files become corrupted, Windows will replace them with the local image, but if this image itself has become corrupted, Windows can’t repair itself.
To overcome this, you can use the DISM (Deployment Image Servicing and Management) tool to repair your system files first.
To do this, Windows Repair 2020, press the F8 key during boot up, then select See advanced repair options.
In the boot troubleshoot menu, select Troubleshoot > Advanced Windows Repair 2020 > Startup Settings > Restart.
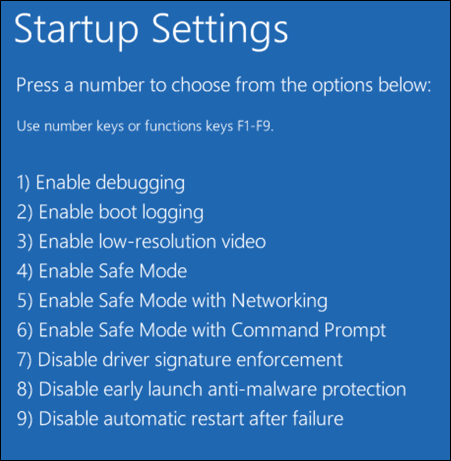
At the next stage, select Enable Safe Mode with Networking by selecting the 5 number key (or F5) on your keyboard. Windows will boot up to Safe Mode, Windows Repair 2020, with only minimal services enabled.
Once Windows boots up in Safe Mode, right-click the Start menu and select Windows PowerShell (Admin).
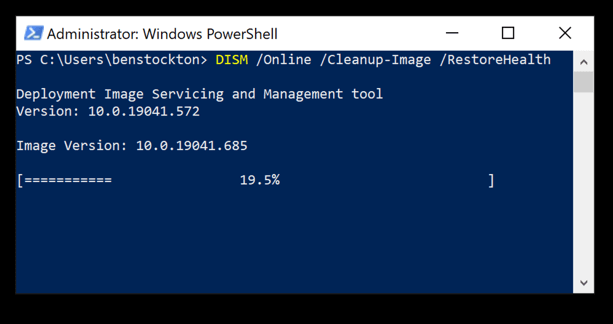
In the PowerShell window, type DISM /Online /Cleanup-Image /RestoreHealth and allow the process to complete, which could take some time.
When the DISM tool finishes running, reboot your PC and use the steps above to boot into a command-line window, repeating the SFC command (sfc /scannow) to ensure Windows is fully repaired.
4. Disable Automatic Startup Repair to Limit Boot Loops
If you’re confident that a Windows 10 installation is still functional, then it’s possible to disable the automatic startup repair system. This should allow you to boot into Windows without the repair loop taking place.
This will only work if Windows is working properly, however. If it isn’t (and you still can’t boot), you may need to consider more drastic fixes (such as restoring Windows) afterwards.
To start, Windows Repair 2020, press F8 and wait for the boot troubleshoot menu to load, selecting See advanced repair to proceed.
In the boot troubleshoot menu, select Troubleshoot > Advanced options > Command Windows Repair 2020, then wait for the command line window to open. You may need to authenticate with your local or Microsoft account password first.
In the command line window, type bcdedit and double-check the values for identifier and recoveryenabled. The identifier value will usually appear as {default}, with recoveryenabled listed as yes.
To change this, Windows Repair 2020, type bcdedit /set {default} recoveryenabled no to disable automatic Microsoft Toolkit Windows 10 repair.
If you’re running this command from a command line or PowerShell window in Safe Mode, you may need to replace the identifier value to {current} instead (e.g. bcdedit /set {current} recoveryenabled no).
Press the cross (X) icon in the top-right to reboot your PC. If Windows can boot, you should be able to sign in as normal at the next stage.
Maintaining a Healthy Windows 10 Installation
If Windows 10 is still in an automatic repair loop (or if it has other issues that prevent it from booting up properly), you may need to consider more drastic repair methods, such as wiping and reinstalling Windows. This may lose your local saved files, so be sure to back up your hard drive before you begin.
Once you’ve managed to fix the repair loop using the steps above, you’ll need to make sure you maintain a healthy installation with regular system maintenance. Keeping Windows updated with new device driver updates and important system upgrades is essential.
If updates become stuck or if updates just won’t install properly, Windows Repair 2020, don’t forget to try some simple fixes, Windows Repair 2020, from a quick restart to running the Windows Update Troubleshooter, Windows Repair 2020. Updating isn’t the only thing you can do to boost your PC performance, Windows Repair 2020, however—even cleaning your PC will have Windows Repair 2020 positive impact.
How to fix automatic repair loop in Windows 10
You can use automatic repair Windows Repair 2020 systems that run Windows 8 and above. This is a Windows system-recovery tool that troubleshoots and diagnoses common boot errors you might encounter.
It’s usually triggered automatically if your system fails to boot for two consecutive attempts. Once activated, this tool will Windows Repair 2020 several diagnostic tests to self-repair and detect Windows Repair 2020 problems that are preventing your device from successfully booting.
Related Resource
Flexible IT models drive efficiency and innovation
A modern approach to infrastructure management
Windows Repair 2020 cover with image of woman in glasses sat at a computer" height="188" src="https://media.itpro.co.uk//image/upload/f_auto,t_resource-card-mobile@1/v1646931139/itpro/Whitepaper%20covers/flexible_it_wp_thumb.jpg" width="321">Free Download
However, sometimes this automatic repair tool will enter an endless reboot loop instead of fixing your boot issues. Users are left with a blue screen of death or a black screen, in most cases. Since there’s no option to stop or delay this reboot, any unsaved data will be irrevocably lost.
There are many reasons why the tool gets stuck in the dreaded automatic repair loop. This could be due to missing or corrupted systems files, including problems with Windows Registry, incompatible hard drives, file corruption in Windows Boot Manager, or even a faulty Windows update.
Here are some obvious signs that you need to look out for which show your Windows automatic repair utility has failed.
Signs you ran into Windows automatic repair loop:
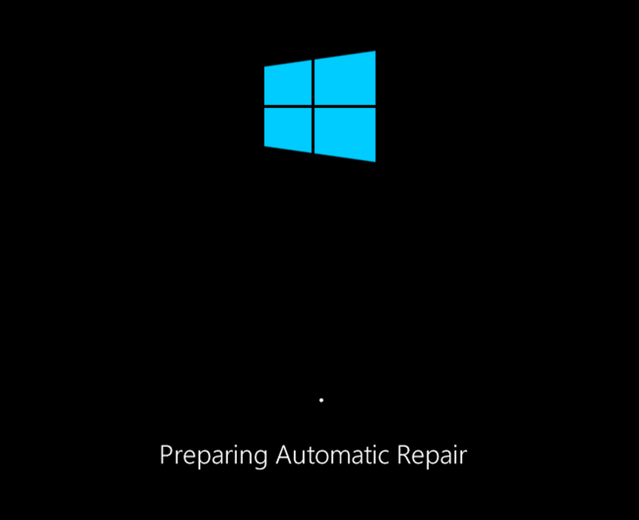
Your device shows a simple black screen with an error message that says "Diagnosing your PC" or "Preparing automatic repair"
The “Preparing automatic repair” message appears on a black screen, but with no indication of progress
A blue screen shows with the message "Automatic repair couldn't repair your PC" or "Your PC did not start correctly"
Windows automatic repair loop fixes
The solutions for fixing the Windows automatic repair loop can vary significantly, depending on if you’re dealing with a black or blue error screen message.
To help you, we’ve put together some solutions on how to bypass the Windows automatic repair loop error quickly and efficiently in each scenario.
Fixing automatic repair loop error on a blue screen
If your screen is showing an error message and is blue, follow these tips to help you solve the problem.
System Restore rolls your system software back to its previous state by overwriting files on your PC’s local drive.
Use the Windows Repair 2020 steps to perform System Restore:
Click on "Advanced options” in the automatic repair blue screen
Navigate to “Troubleshoot” > “Advanced Options” > “System Restore”
Choose the restore point created right before the blue screen appeared (Windows 10 creates a system restore point each time it installs an update, driver, or app)
Click "Next"
Wait until the restore process finishes, then restart your computer.
2. Run built-in system repair tools
Windows offers built-in System File Checker and CHKDSK (check disk) utility tools to check and repair missing or corrupted system files.
Access these helpful tools using the steps given below:
Restart your PC and press the “F8” key (this will trigger the Windows troubleshooting menu)
Select “See advanced repair options”
In the “Choose an option” menu, click “Troubleshoot”
Under the “Troubleshoot” menu, select the “Advanced options” option
Select “Command Prompt” in the “Advanced options”
In Windows Repair 2020 command prompt window, type “chkdsk /r c:” and hit Enter. This command will check your drive for errors using the CHKDSK utility and automatically repair them if possible
Fixing automatic repair loop error on a black screen
If you received an error message on a black screen, there are different steps to take.
These tips will help you fix the issue.
1. Boot into Safe Mode
In Safe Mode, you can uninstall device drivers, Windows Repair 2020, roll back Windows 10 updates, remove viruses, and more.
Here’s how to launch your system in Safe Mode:
Turn off your PC
Download and install Windows Installation Media
Restart your PC
Upon rebooting, press “F2,” “F11,” or “Delete” to enter BIOS
Boot using “Windows Installation Windows Repair 2020 the Windows Setup window, choose "Next"
Navigate to "Repair your computer" > "Troubleshoot" > "Advanced options" autocad 2021 download "Startup Settings”
Choose the Safe Mode (Enable Safe Mode, Enable Safe Mode with Networking, and Enable Safe Mode with Command Prompt) that meets your needs
Once you enter your desired Safe Mode, run antivirus software to scan and remove viruses. Benvista Photozoom Pro problematic files by uninstalling incompatible software or drivers and update your device driver.
2. Disable automatic repair
When all else fails, Windows Repair 2020, disable the automatic repair tool using the following steps:
Insert a Windows installation disc/media into your PC
Select your language preferences, and click “Next”
Click on “Repair your computer”
Click on “Troubleshoot”
Click on “Advanced Options”
Click on “Command Prompt”
In the command prompt window, type “bcdedit /set {current} recoveryenabled No” and hit “Enter” (this command deletes problematic system files)
Type “exit” and press Enter
Go the extra mile, configure automatic backups on Windows 10
Sudden shutdowns can crush your productivity. Worse yet, it can wipe out unsaved data, leaving you flustered and anxious. With a backup ready, you can access your critical files and folder at all times, regardless of boot errors.
To configure automatic backups on Windows 10, Windows Repair 2020, use the following steps:
Open Settings and click on “Update & Security”
Click on “Backup”
Under the "Looking Windows Repair 2020 an older backup" section, click on UltraISO Premium Crack to Backup and Restore”
Under the "Backup or restore your files" section, select “Set up backup option” option
Select a backup destination (removable drive) to store your automatic backups
Click “Next”
Under the "What do you want to backup?" section, Windows Repair 2020, click on “Let me choose”
Click “Next”
Under the "Computer" section, Windows Repair 2020, check “Local Disk (C:)”
Check the “Include a system of drives: System Reserved, Windows 10 (C:)” option
Click “Next”
Under the “Review your backup settings” section, click on “Change schedule”
In the “How often do you want to backup?” prompt, select “Run backup on a schedule”
Set the frequency, date, and time for backup (choose ‘Daily’ for continuous backup)
Click “OK”
Click “Save settings”
Click “Exit”
To retrieve individual files or entire system data from a backup on Windows 10, use the following steps:
Open Settings
Click on “Update & Security”
Click on “Backup”
Under the "Looking for an older backup" section, click on “Go to Backup and Restore”
Under the "Restore" section, click on “Restore my files”
Click “Browse for files” and select the files that you want to restore
Click “Add files”
Click “Browse for folders” and select the folders that you want to restore
Click “Next”
In the “Where do you want to restore your files?” prompt, click on “Browse”
Three ways manual coding is killing your business productivity
.and how you can fix it
Free Download
Goodbye broadcasts, Windows Repair 2020, hello conversations
Drive conversations across the funnel with the WhatsApp Business Platform
Free Download
Winning with multi-cloud
How to drive a competitive advantage and overcome data integration challenges
Free Download
Talking to a business should feel like messaging a friend
Managing customer conversations at scale with the WhatsApp Business Platform
Free Download
How to Perform a Startup Repair in Windows 7
Startup Repair Didn't Fix the Problem?
It's possible that Startup Repair didn't fix whatever problem you were having. If the Startup Repair tool determines this itself, it might automatically run again after your computer restarts. If it doesn't automatically run but you're still seeing problems with Windows 7, repeat these steps to run Startup Repair again manually.
Also, Windows Repair 2020, be sure to read the Important note on Step 1.
If it becomes apparent that Startup Repair isn't going to solve your Windows 7 problem, you do have some additional recovery options including a System Restore or a System Image Recovery, assuming you have previously backed up your entire computer.
You could also try a Parallel Install of Windows 7 or a Clean Install of Windows 7.
However, if you've tried a Startup Repair of Windows 7 as part of another troubleshooting guide, you're probably best served by continuing with whatever specific advice that guide is giving as your next step.
Thanks for letting us know!
Get the Latest Tech News Delivered Every Day
Subscribe
Windows Repair 2020 - sorry, that
So Many Happy Users, Let's See What Some Have To Say!
Have doubts?
Call us 24/7 and get a free diagnosis
+1 (917) 341 2602
*Additional services may be offered
Trusted Reviews and Accreditation
We're Proud Accredited Members of the Better Business Bureau
We choose to seek accreditation with the Better Business Bureau because we want our customers to know how much we value the quality of their experiences with our software. BBB accredited businesses must adhere to 8 Standards of Trust that are designed to encourage positive interactions with every customer. In order to maintain accreditation. See our BBB page.
Build Trust
Advertise Honestly
Tell the Truth
Be Transparent
Honor Promises
Be Responsive
Safeguard Privacy
Embody Integrity
Our # 1 goal is customer satisfaction, we know the importance of creating and keeping happy customers.
Excellent
Based on Trustpilot authentic reviews
Cleaned tons of hidden items
Cleaned tons of hidden items of my computer and restored functionality lost years ago. Runs like new again.
Kenneth Fisher
It deals with a lot of issues to the PC
It deals with a lot of issues to the PC which is very comprehensive and thorough.
Shahruddin
FAST
FAST, THOROUGH AND EFFICENT. GREAT APP.
Rick Asche
Best software for tuneup PC
Best software for tuneup PC
Jurnal Patroli News
very easy to use and powerful tool to
very easy to use and powerful tool to clean unwanted garbage from PC.
Yunus
a very professional cleaner
it is definitely a very professional pc cleaner with many details of problems that slow down your pc.
yih loong gan
Superb Software
Superb Software To Increase PC Performance
No.1 Tips Provider
The interface is very easy to use
The interface is very easy to use, its very versatile and my PC runs faster than ever now!
Mzie Moyo
Works very well
Works very well, cleaned a lot of junk off my computer.
Jim
‹›
We are proud to announce we are Microsoft Certified Partners
Advanced System Repair, Inc. corporation, a leading producer of award-winning utility software, i a US-based software company serving millions of customers in 150+ countries worldwide. We maintain a global corporate presence in the United States, Germany, France, Italy, Norwegian, Japan and Spain. Microsoft certified solution providers specialize in providing up-to-date Microsoft technology-based customer solutions all over the world. When you join a Microsoft partner program, you become part of a global community that connects you to the relationships, insights, tools, resources, and programs you need to amaze your customers and drive business growth. Click here to view our certification.
We are proud to announce our longterm partnership with Intel
As an Inter partner, you have a unique advantage to gain the expertise and knowledge to guide your customers towards business success. The Intel Software Partner Program provides partner software developers with support and resources to helo them develop, optimize, and market commercial applications running on Intel platforms and technologies. Click here to view our certification.
Advanced System Repair earns AppEsteem Certifications
Founded and led by former cybersecurity executives at Microsoft, AppEsteem is dedicated to a simple vision: " Consumers have nothing to fear when installing and using apps on their computing devices." The company offers technology and services to help the software industry thrive by encouraging the development and distribution of clean apps, while discouraging fraudulent practices that harm consumers. AppEsteem works with leaders across the industry, including software vendors, large software platforms, and anti-malware companies. Click here to view our certification.
Advanced System Repair is a proud to announce our new verified non-malicous app certification
CheckMark Certified / Westcloast Labs – This special test is designed to provide a high-level outline of the testing requirements and procedures that form the Checkmark Certified Verified Genuine Solution accreditation. Each software application that attains Verified status under Checkmark Certified, must meet a set of criteria designed to show that the software application in question is a genuine non-malicous security solution and takes steps to attempt to better the current level of security. Click here to viewour certification report.
Advanced System Repair is a proud member of CleanApps.org
CleanApps – a place where members thrive and consumers are respected. Advanced System Repair proud Charter member (Charter members are the highest level members) of CleanApps (cleanapps.org), an organization dedicated to consumer privacy and industry compliance. CleanApps provides guidance and advocacy for industry leaders including Microsoft. CleanApps is committed to fostering an app ecosystem where consumers are respected. Click here to view our Status with CleanApps.
Advanced System Repair earns Westcoast Labs / Checkmark Certified Certifications
Checkmark certified provides one of the most comprehensive testing and certification labs in the industry. The company has a global client base of Fortune 500/1000 companies, government agencies and leading technology developers, providing a wide range of product testing and technical consultancy services. A global leader in research, testing, certification and real-time performance validation for information security products and services. To qualify the solution must meet the baseline detection rate and also the minimum performance standard for protection within the RealTime Network. Technologies include AV Desktop and UTM. Click here to view our certification. Click here to view us on Westcoast Labs / Checkmark Certified site
Industry-first Innovative and Patented Pending Technology (Patent Pending # 62/675,030)
Industry-first innovative and patented technology of sharing and acquiring PC optimization experience among all clients, which lets you automatically receive and apply most efficient PC tunings from all over the world.
Get a faster, cleaner and smoother PC
Advanced System Repair Pro brings you all the tools you need in one program to clean, fix, protect, optimize and boost your PC!
Fix annoying PC issues
Get a cleaner computer in minutes
Speed up and revive your PC
Fix your PC issues
Our multi-scan feature will intelligently scan and analyze your computer in minutes and give you complete thorough organized, detailed results.
Speed up, tune up and protect your PC
Start with a free scan from Advanced System Repair. You'll immediately find out the root issues affecting your machine's performance.
Get the All-In-One Ultimate PC Care! PC Tune Up Made Easy!
Advanced System Repair Includes everything you need to keep your PC running like brand new again
Advanced System Repair
Next generation tune-up and cleanup for your PC
Our test is proof we know what we are doing!
At Advanced System Repair, we believe computers are meant to speed things up, not slow things down, so you can work smarter and faster. See our test results below.
22,000
privacy traces cleaned*
* The results from our lab are indicative only. Your results may vary.
You can repair some apps and programs if they're not running correctly. Note that you won't see repair, change, or modify options for all apps and programs.
Repair options from the Settings page
Select Start > Settings > Apps > Apps & features.
Apps & features in Settings
Select the More icon next to the app you want to fix.
Select the Advanced options link under the name of the app (some apps don't have this option). On the page that opens, select Repair if it's available. If it isn't available or doesn't fix the problem, select Reset.
Repair options from the Control Panel
In the search box on the taskbar, type control panel and select Control Panel from the results.
Select Programs > Programs and Features.
Right-click the program you want to fix and select Repair, or if that’s not available, select Change. Then follow the directions on the screen.
For more tips, see Repair an Office application. You can also remove apps or programs.
You can repair some apps and programs if they're not running correctly. Note that you won't see repair, change, or modify options for all apps and programs.
Repair options from the Settings page
Select Start > Settings > Apps > Apps & features.
Apps & features in Settings
Select the app you want to fix.
Select the Advanced options link under the name of the app (some apps don't have this option). On the page that opens, select Repair if it's available. If it isn't available or doesn't fix the problem, select Reset.
Repair options from the Control Panel
In the search box on the taskbar, type control panel and select Control Panel from the results.
Select Programs > Programs and Features.
Right-click the program you want to fix and select Repair, or if that’s not available, select Change. Then follow the directions on the screen.
For more tips, see Repair an Office application. You can also remove apps or programs.
A bad system update, a new graphics card, corrupted system files, even a fresh USB mouse—any of these can cause a dreaded Windows 10 automatic repair loop to occur when you’re trying to boot up a Windows PC.
You’ll usually see this error when Windows 10 tries to boot and can’t, forcing itself through an endless cycle of automatically trying to repair itself. If Windows can’t repair itself, it reboots and repeats the cycle. To fix a Windows 10 automatic repair loop, here’s what you’ll need to do.
What Causes a Windows 10 Automatic Repair Loop?
There isn’t a single cause for a Windows 10 automatic repair loop, but there are several situations that are likely to cause it. Missing or corrupted system files are one of the more common causes, where Windows can’t boot (or repair itself) because these essential files it needs to run aren’t available.
This prevents the Windows kernel (ntoskrnl.exe) and other essential Windows services from fully loading, preventing you from using your PC. Another issue that could cause a repair loop is a newly installed component or connected peripheral that’s missing a device driver (or just isn’t working correctly).
If you’ve recently upgraded your PC, your new components will need device drivers to allow Windows to use it. If the drivers are missing, out-of-date, or not supported, it could cause a repair loop, especially for critical components like a new graphics card.
Other problems, such as faulty components, malware infection, corrupted system registry, and even broken installation files all point to a possible cause. Thankfully, many of the fixes you can try below will work for most causes of a Windows 10 automatic repair loop.
1. Disconnect or Remove Recently Installed or Connected Devices
If you recently installed new hardware before a Windows 10 automatic repair loop began to appear, then the hardware you’ve installed is a likely cause of the problem.
This is usually because of a missing driver or driver conflict. Device drivers allow Windows to interface the hardware (such as your graphics card) with the software (Windows services and third-party software). If the drivers are missing or broken, this can stop Windows from booting up properly.
In most cases, removing the problematic device will allow Windows to skip over the issue. If Windows boots with the device removed, you can then look at installing new drivers or replacing the component. For instance, installing a new graphics card could require you to download and install drivers from the manufacturer’s website.
2. Run System Repair Tools (Chkdsk, SFC)
If you can’t immediately trace the cause of a Windows 10 automatic repair loop, the best thing to do is start with some common system repair tools. While Windows can’t boot, you can usually force Windows to boot to a command prompt window using the Advanced Options menu screen.
To do this, restart your PC and press the F8 key on your keyboard before the Windows logo and spinning icon appears (you may need to repeat this step a few times). This should cause the Windows boot troubleshooting menu to appear. Select See advanced repair options to begin.
In the Choose an option menu, select the Troubleshoot option.
In the Troubleshoot menu, select the Advanced options option.
Select Command Prompt in the Advanced options menu to boot to a minimal version of Windows, showing only a command prompt window.
In the command prompt window, type chkdsk /r c: to begin a low-level check of your system drive for errors using the Check Disk utility. If it detects errors, chkdsk will automatically repair them (if possible).
Next, you can check the integrity of Windows system files by using the System File Checker tool. Type sfc /scannow to begin. This could take some time to complete.
Once you’re finished, press the cross (X) icon in the top-right to close the command prompt window and restart your PC.
3. Run the Windows 10 DISM tool
The System File Checker utility above will fix system files using a local Windows image. If certain files become corrupted, Windows will replace them with the local image, but if this image itself has become corrupted, Windows can’t repair itself.
To overcome this, you can use the DISM (Deployment Image Servicing and Management) tool to repair your system files first.
To do this, press the F8 key during boot up, then select See advanced repair options.
In the boot troubleshoot menu, select Troubleshoot > Advanced options > Startup Settings > Restart.
At the next stage, select Enable Safe Mode with Networking by selecting the 5 number key (or F5) on your keyboard. Windows will boot up to Safe Mode, with only minimal services enabled.
Once Windows boots up in Safe Mode, right-click the Start menu and select Windows PowerShell (Admin).
In the PowerShell window, type DISM /Online /Cleanup-Image /RestoreHealth and allow the process to complete, which could take some time.
When the DISM tool finishes running, reboot your PC and use the steps above to boot into a command-line window, repeating the SFC command (sfc /scannow) to ensure Windows is fully repaired.
4. Disable Automatic Startup Repair to Limit Boot Loops
If you’re confident that a Windows 10 installation is still functional, then it’s possible to disable the automatic startup repair system. This should allow you to boot into Windows without the repair loop taking place.
This will only work if Windows is working properly, however. If it isn’t (and you still can’t boot), you may need to consider more drastic fixes (such as restoring Windows) afterwards.
To start, press F8 and wait for the boot troubleshoot menu to load, selecting See advanced repair to proceed.
In the boot troubleshoot menu, select Troubleshoot > Advanced options > Command Prompt, then wait for the command line window to open. You may need to authenticate with your local or Microsoft account password first.
In the command line window, type bcdedit and double-check the values for identifier and recoveryenabled. The identifier value will usually appear as {default}, with recoveryenabled listed as yes.
To change this, type bcdedit /set {default} recoveryenabled no to disable automatic boot repair.
If you’re running this command from a command line or PowerShell window in Safe Mode, you may need to replace the identifier value to {current} instead (e.g. bcdedit /set {current} recoveryenabled no).
Press the cross (X) icon in the top-right to reboot your PC. If Windows can boot, you should be able to sign in as normal at the next stage.
Maintaining a Healthy Windows 10 Installation
If Windows 10 is still in an automatic repair loop (or if it has other issues that prevent it from booting up properly), you may need to consider more drastic repair methods, such as wiping and reinstalling Windows. This may lose your local saved files, so be sure to back up your hard drive before you begin.
Once you’ve managed to fix the repair loop using the steps above, you’ll need to make sure you maintain a healthy installation with regular system maintenance. Keeping Windows updated with new device driver updates and important system upgrades is essential.
If updates become stuck or if updates just won’t install properly, don’t forget to try some simple fixes, from a quick restart to running the Windows Update Troubleshooter. Updating isn’t the only thing you can do to boost your PC performance, however—even cleaning your PC will have a positive impact.
How to Fix a "Stuck in Automatic Repair" Loop in Windows 10
If you ever encountered an error and don't know what to do, Windows 10 comes equipped with troubleshooting tools to fix it for you. One of those convenient tools is the automatic repair tool. It is a handy repair feature that can troubleshoot issues that stop you from booting correctly.
But, what do you do when the tool itself is the cause of the error? If your PC is stuck in an automatic repair loop, we have devised a list of solutions to fix your error.
What Is an Automatic Repair Loop, and What Causes It?
An automatic repair loop is an error that occurs when Windows 10 tries to boot and fails, then forcefully boots up the automatic repair tool and tries to repair itself. When Windows can’t repair itself, it reboots and repeats itself in an endless cycle.
There isn’t a single cause for a Windows 10 automatic repair loop, and they can be hard to figure out. The most common cause tends to be missing or corrupted system files, in which Windows can’t boot or repair itself because these essential files it needs to run aren’t available.
Missing device drivers can also be one of the biggest causes of the error. If you have recently upgraded your PC, your new components will need device drivers to allow Windows to use them. If the drivers are missing, out-of-date, or not supported, they could cause a repair loop. New peripherals can also cause this error if their drivers aren't installed correctly.
Other possible causes tend to be related to faulty components, malware infections, corrupted system registries, and even broken installation files. But, there is no need to worry as our solutions will work for most causes of a Windows 10 automatic repair loop.
1. Run Fixboot and Chkdsk Commands
If you can’t identify any cause of a Windows 10 automatic repair loop, you can use some system repair tools to try to fix it. The chkdsk command starts a low-level check of your system drive for errors using the Check Disk utility. If it detects errors, it will automatically repair them.
While Windows can’t boot, you can still force Windows to boot to a Command Prompt window using the Advanced options menu screen.
To do this:
Restart your PC and press the F8 key on your keyboard before the Windows logo and spinning icon appears. This will cause the Windows boot troubleshooting menu to appear. Select See advanced repair options to begin.
From the Choose an option screen, select Troubleshoot > Advanced options > Command Prompt.
In the Command Prompt window, type the following command and press Enter:
If the chkdsk command fails, you can also try using the Fixboot command. In the same Command Prompt window, enter the following command and press Enter:
Once you are finished, close the Command Prompt window and restart your PC.
2. Perform a System Scan in Safe Mode
If system repair tools find corrupted files, Windows replaces those files with the local image. However, if this image itself has become corrupted, Windows can’t repair itself and causes the previous commands to fail. To repair this, we can use the DISM (Deployment Image Servicing and Management) tool.
To use this tool, we first must enable Safe Mode. This loads a basic version of Windows without any third-party programs to help you fix your start-up errors.
The first step, like before, is to restart your PC and press the F8 key while booting to open the Windows boot troubleshooting menu.
Now, you will see a list of various restart options. Choose Enable Safe Mode with Networking by selecting F5 on your keyboard.
Once Windows boots up in Safe Mode, right-click the Start menu and select Windows PowerShell (Admin).
In the PowerShell window, type the following command and press Enter:
This will take some time to finish. When the DISM tool finishes running, reboot your PC and follow the above steps to open the PowerShell window in Safe Mode again.
This time, type the following command and press Enter:
This will check the integrity of Windows system files and allow us to verify if Windows is fully repaired.
3. Restore the Windows Registry
Sometimes, malware infections or disk issues can also end up corrupting the registry files. As such, you need to head into the Windows registry and tweak some values there to get things working once more.
To fix registry issues, you can restore it with the following steps:
If you are asked to overwrite files, type All and press Enter.
Once you are finished, restart your PC.
4. Disable the Automatic Repair Tool
If you believe that your Windows is functional, you can try to disable the automatic startup repair system. This should allow you to boot into Windows without the repair loop taking place. However, this will only work if your Windows system is working properly. You can use it to determine if your Windows is really at fault.
To disable Windows 10 automatic repair tool, follow these steps:
Type the following command and press Enter: bcdedit
Check the values for identifier and recoveryenabled. The identifier value should be {default} and recoveryenabled should be yes.
Now, type this command and press Enter:
This will disable the automatic boot repair. If the command doesn't work, try the following command:
Once you are finished, restart your PC.
5. Disable Early Launch Anti-Malware
The Early Launch Anti-malware (ELAM) program protects computers from threats that start up with the computer. It begins working prior to any boot-up drivers to analyze them and assists Windows Kernel in deciding if it is safe to launch the drivers.
Although it typically works fine, sometimes it can incorrectly classify critical boot drivers as malicious because of false alarms, which can then result in errors like the one under consideration.
Follow these steps to disable ELAM:
Launch the Windows troubleshooting menu and navigate to Advanced options > Startup Settings.
To disable the early launch anti-malware protection feature, press 5 or F5 on your keyboard and then restart your PC.
If ELAM was causing the issue, disabling it should do the trick for you.
6. Reset Your Windows 10 Device
The last resort for a computer stuck in an automatic repair boot loop is resetting Windows 10. You don't have to worry about losing your files and data as you have an option to proceed with either a clean reset (deleting everything) or preserve your files.
To reset a Windows 10 PC, open the Windows boot troubleshooting menu and select Troubleshoot > Reset this PC.
Dealing With the Automatic Repair Loop
It can be frustrating to deal with a never-ending loop due to a tool meant to resolve your problems. It can be difficult to diagnose and understand, but our solutions will be sure to help you out and return your PC to normal.
Screenshots for Windows Repair (All In One)
BleepingComputer Review:
Windows Repair is a utility that contains numerous mini-fixes for Windows. This tool will allow you to repair common issues with your computer such as firewall, file permission, and Windows Update problems. When using this tool you can select the particular fixes you would like to launch and start the repair process. This tool also comes in a portable version that allows you to use the program from a portable device such as a USB flash drive.
Windows Repair can perform the following tasks:
Reset Registry Permissions
Reset File Permissions
Register System Files
Repair WMI
Repair Windows Firewall
Repair Internet Explorer
Repair MDAC & MS Jet
Repair Hosts File
Remove Policies Set By Infections
Repair Icons
Repair Winsock & DNS Cache
Remove Temp Files
Repair Proxy Settings
Unhide Non System Files
Repair Windows Updates
Repair CD/DVD Missing/Not Working
Tweaking.com - Windows Repair 4.13.1 Change Log
Updated default registry and file permissions for Windows 10 and 11 as of Sept 5th, 2022.


 ‹›
‹›


 Free Download
 Free Download
 Free Download
 Free Download
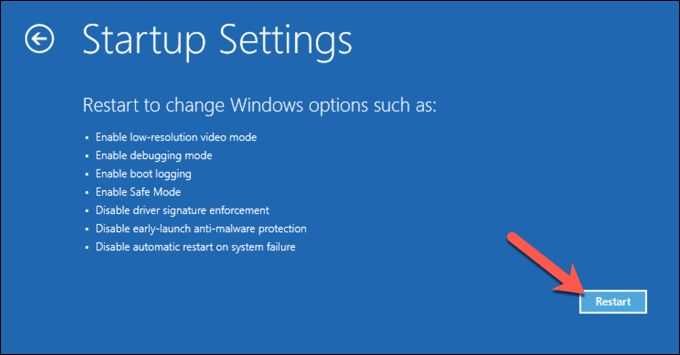
 ';} ?>
It is remarkable, it is rather valuable answer